深度链接
本指南将介绍如何配置你的应用以处理各种平台上的深度链接。要处理传入的链接,你需要处理 2 种情况
- 如果应用之前未打开,则深度链接需要设置初始状态
- 如果应用已打开,则深度链接需要更新状态以反映传入的链接
React Native 提供了 Linking 模块来接收传入链接的通知。React Navigation 可以与 Linking 模块集成,以自动处理深度链接。在 Web 上,React Navigation 可以与浏览器的 history API 集成,以处理客户端的 URL。请参阅 配置链接 以了解有关如何在 React Navigation 中配置链接的更多详细信息。
虽然你不需要使用 React Navigation 的 linking prop,并且可以通过使用 Linking API 并从那里导航来自己处理深度链接,但这将比使用 linking prop 复杂得多,后者为你处理了许多边缘情况。因此,我们不建议你自己实现它。
下面,我们将介绍使深度链接集成工作所需的配置。
使用 Expo 项目设置
首先,你需要为你的应用指定一个 URL 方案。这对应于 URL 中 :// 之前的字符串,因此如果你的方案是 mychat,那么指向你的应用的链接将是 mychat://。你可以在你的 app.json 中注册一个方案,方法是在 scheme 键下添加一个字符串
{
  "expo": {
    "scheme": "mychat"
  }
}
接下来,安装 expo-linking,我们需要它来获取深度链接前缀
npx expo install expo-linking
然后,让我们配置 React Navigation 以使用 scheme 来解析传入的深度链接
- 静态
- 动态
import * as Linking from 'expo-linking';

const prefix = Linking.createURL('/');

/* content */

function App() {
  const linking = {
    prefixes: [prefix],
  };

  return <Navigation linking={linking} />;
}
import * as Linking from 'expo-linking';

const prefix = Linking.createURL('/');

function App() {
  const linking = {
    prefixes: [prefix],
  };

  return (
    <NavigationContainer linking={linking} fallback={<Text>Loading...</Text>}>
      {/* content */}
    </NavigationContainer>
  );
}
必须使用 Linking.createURL 的原因是方案会因你是在客户端应用还是在独立应用中而异。
在 app.json 中指定的方案仅适用于独立应用。在 Expo 客户端应用中,你可以使用 exp://ADDRESS:PORT/--/ 进行深度链接,其中 ADDRESS 通常是 127.0.0.1,PORT 通常是 19000 - URL 在你运行 expo start 时打印。Linking.createURL 函数将其抽象出来,以便你无需手动指定它们。
如果你正在使用通用链接,你还需要将你的域名添加到前缀中
const linking = {
  prefixes: [Linking.createURL('/'), 'https://app.example.com'],
};
使用裸 React Native 项目设置
在 iOS 上设置
让我们配置原生 iOS 应用以基于 mychat:// URI 方案打开。
你需要按照此处描述的步骤将 RCTLinking 链接到你的项目。为了能够监听传入的应用链接,你需要将以下行添加到你项目中的 AppDelegate.m
// Add the header at the top of the file:
#import <React/RCTLinkingManager.h>

// Add this inside `@implementation AppDelegate` above `@end`:
- (BOOL)application:(UIApplication *)application
   openURL:(NSURL *)url
   options:(NSDictionary<UIApplicationOpenURLOptionsKey,id> *)options
{
  return [RCTLinkingManager application:application openURL:url options:options];
}
如果你的应用正在使用 通用链接,你还需要添加以下代码
// Add this inside `@implementation AppDelegate` above `@end`:
- (BOOL)application:(UIApplication *)application continueUserActivity:(nonnull NSUserActivity *)userActivity
 restorationHandler:(nonnull void (^)(NSArray<id<UIUserActivityRestoring>> * _Nullable))restorationHandler
{
 return [RCTLinkingManager application:application
                  continueUserActivity:userActivity
                    restorationHandler:restorationHandler];
}
现在你需要将方案添加到你的项目配置中。
最简单的方法是使用 uri-scheme 包,运行以下命令
npx uri-scheme add mychat --ios
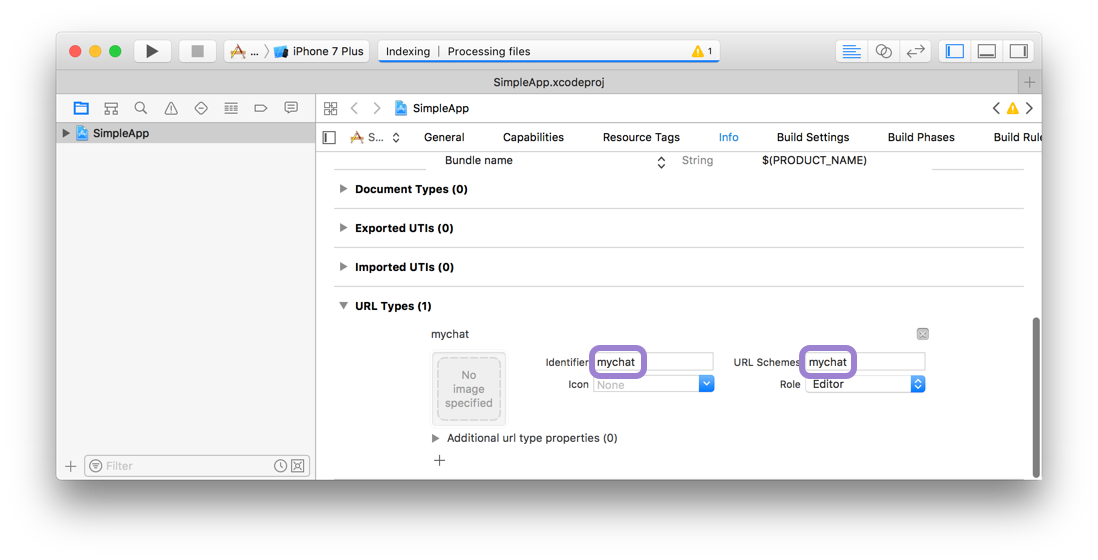
如果你想手动执行此操作,请在 Xcode 中打开项目(例如 SimpleApp/ios/SimpleApp.xcworkspace)。在侧边栏中选择项目,然后导航到 info 选项卡。向下滚动到 “URL Types” 并添加一个。在新的 URL 类型中,将标识符和 URL 方案设置为你想要的 URL 方案。
为了确保通用链接在你的应用中工作,你还需要在你的服务器上设置 关联域名。
混合 React Native 和原生 iOS 应用
如果你在混合应用(一个同时具有 Swift/ObjC 和 React Native 部分的 iOS 应用)中使用 React Navigation,你可能会在你的 Podfile 中缺少 RCTLinkingIOS subspec,它在新 React Native 项目中默认安装。要添加它,请确保你的 Podfile 看起来像这样
 pod 'React', :path => '../node_modules/react-native', :subspecs => [
    . . . // other subspecs
    'RCTLinkingIOS',
    . . .
  ]
在 Android 上设置
要配置 Android 中的外部链接,你可以在 manifest 中创建一个新的 intent。
最简单的方法是使用 uri-scheme 包:npx uri-scheme add mychat --android。
如果你想手动添加它,请打开 SimpleApp/android/app/src/main/AndroidManifest.xml,并进行以下调整
- 将
MainActivity的launchMode设置为singleTask,以便在现有的MainActivity上接收 intent (这是默认设置,因此你可能不需要实际更改任何内容)。 - 在
MainActivity条目内添加新的intent-filter,并使用VIEW类型 action
<activity
    android:name=".MainActivity"
    android:launchMode="singleTask">
    <intent-filter>
        <action android:name="android.intent.action.MAIN" />
        <category android:name="android.intent.category.LAUNCHER" />
    </intent-filter>
    <intent-filter>
        <action android:name="android.intent.action.VIEW" />
        <category android:name="android.intent.category.DEFAULT" />
        <category android:name="android.intent.category.BROWSABLE" />
        <data android:scheme="mychat" />
    </intent-filter>
</activity>
与 iOS 上的通用链接类似,你还可以通过 验证 Android App Links 在 Android 上使用域名将应用与你的网站关联起来。首先,你需要配置你的 AndroidManifest.xml
- 将
android:autoVerify="true"添加到你的<intent-filter>条目中。 - 在
<intent-filter>内的新<data>条目中添加你的域名的scheme和host。
添加它们后,它应该看起来像这样
<activity
    android:name=".MainActivity"
    android:launchMode="singleTask">
    <intent-filter>
        <action android:name="android.intent.action.MAIN" />
        <category android:name="android.intent.category.LAUNCHER" />
    </intent-filter>
    <intent-filter>
        <action android:name="android.intent.action.VIEW" />
        <category android:name="android.intent.category.DEFAULT" />
        <category android:name="android.intent.category.BROWSABLE" />
        <data android:scheme="mychat" />
    </intent-filter>
    <intent-filter android:autoVerify="true">
        <action android:name="android.intent.action.VIEW" />
        <category android:name="android.intent.category.DEFAULT" />
        <category android:name="android.intent.category.BROWSABLE" />
        <data android:scheme="http" />
        <data android:scheme="https" />
        <data android:host="www.example.com" />
    </intent-filter>
</activity>
然后,你需要通过托管 Digital Asset Links JSON 文件来 声明 你的网站和你的 intent filters 之间的关联。
测试深度链接
在测试深度链接之前,请确保你在你的模拟器/设备中重新构建并安装了应用。
如果你在 iOS 上测试,运行
npx react-native run-ios
如果你在 Android 上测试,运行
npx react-native run-android
如果你正在使用 Expo managed workflow 并在 Expo 客户端上进行测试,则无需重新构建应用。但是,你将需要使用运行 expo start 时打印的正确地址和端口 (见上文),例如 exp://127.0.0.1:19000/--/。
如果你想在你的 Expo 应用中使用你的自定义方案进行测试,你将需要通过运行 expo build:ios -t simulator 或 expo build:android 重新构建你的独立应用并安装生成的二进制文件。
使用 npx uri-scheme 测试
uri-scheme 包是一个命令行工具,可用于在 iOS 和 Android 上测试深度链接。它可以按如下方式使用
npx uri-scheme open [your deep link] --[ios|android]
例如
npx uri-scheme open "mychat://chat/jane" --ios
或者如果使用 Expo 客户端
npx uri-scheme open "exp://127.0.0.1:19000/--/chat/jane" --ios
在 iOS 上使用 xcrun 测试
xcrun 命令可以按如下方式用于使用 iOS 模拟器测试深度链接
xcrun simctl openurl booted [your deep link]
例如
xcrun simctl openurl booted "mychat://chat/jane"
在 Android 上使用 adb 测试
adb 命令可以按如下方式用于使用 Android 模拟器或连接的设备测试深度链接
adb shell am start -W -a android.intent.action.VIEW -d [your deep link] [your android package name]
例如
adb shell am start -W -a android.intent.action.VIEW -d "mychat://chat/jane" com.simpleapp
或者如果使用 Expo 客户端
adb shell am start -W -a android.intent.action.VIEW -d "exp://127.0.0.1:19000/--/chat/jane" host.exp.exponent
第三方集成
React Native 的 Linking 不是处理深度链接的唯一方法。你可能还想集成其他服务,例如 Firebase Dynamic Links、Branch 等,它们提供自己的 API 来获取传入链接的通知。
为了实现这一点,你需要覆盖 React Navigation 订阅传入链接的方式。为此,你可以提供你自己的 getInitialURL 和 subscribe 函数
- 静态
- 动态
const linking = {
  prefixes: ['myapp://', 'https://myapp.com'],

  // Custom function to get the URL which was used to open the app
  async getInitialURL() {
    // First, you would need to get the initial URL from your third-party integration
    // The exact usage depend on the third-party SDK you use
    // For example, to get the initial URL for Firebase Dynamic Links:
    const { isAvailable } = utils().playServicesAvailability;

    if (isAvailable) {
      const initialLink = await dynamicLinks().getInitialLink();

      if (initialLink) {
        return initialLink.url;
      }
    }

    // As a fallback, you may want to do the default deep link handling
    const url = await Linking.getInitialURL();

    return url;
  },

  // Custom function to subscribe to incoming links
  subscribe(listener) {
    // Listen to incoming links from Firebase Dynamic Links
    const unsubscribeFirebase = dynamicLinks().onLink(({ url }) => {
      listener(url);
    });

    // Listen to incoming links from deep linking
    const linkingSubscription = Linking.addEventListener('url', ({ url }) => {
      listener(url);
    });

    return () => {
      // Clean up the event listeners
      unsubscribeFirebase();
      linkingSubscription.remove();
    };
  },
};
const linking = {
  prefixes: ['myapp://', 'https://myapp.com'],

  // Custom function to get the URL which was used to open the app
  async getInitialURL() {
    // First, you would need to get the initial URL from your third-party integration
    // The exact usage depend on the third-party SDK you use
    // For example, to get the initial URL for Firebase Dynamic Links:
    const { isAvailable } = utils().playServicesAvailability;

    if (isAvailable) {
      const initialLink = await dynamicLinks().getInitialLink();

      if (initialLink) {
        return initialLink.url;
      }
    }

    // As a fallback, you may want to do the default deep link handling
    const url = await Linking.getInitialURL();

    return url;
  },

  // Custom function to subscribe to incoming links
  subscribe(listener) {
    // Listen to incoming links from Firebase Dynamic Links
    const unsubscribeFirebase = dynamicLinks().onLink(({ url }) => {
      listener(url);
    });

    // Listen to incoming links from deep linking
    const linkingSubscription = Linking.addEventListener('url', ({ url }) => {
      listener(url);
    });

    return () => {
      // Clean up the event listeners
      unsubscribeFirebase();
      linkingSubscription.remove();
    };
  },

  config: {
    // Deep link configuration
  },
};
与上面的示例类似,你可以集成任何提供获取初始 URL 和订阅新传入 URL 的 API,使用 getInitialURL 和 subscribe 选项。